

How To Add More Shapes To Powerpoint


How often have yous heard that a movie is worth a thousand words? That well-known quote could very well be true for a study or presentation. Visual aids may even have more of an bear upon than text lonely. Here's how you tin can add supporting multimedia to PowerPoint presos and create images of your own.
- How to depict on presentations
- How to depict shapes
- How to add images in PowerPoint
- How to group pictures and shapes
PowerPoint and Role 365 provide a few ways to add images and graphics to your files. These include shapes, prune fine art, and images stored locally or in the cloud. You have the freedom to set the location, size, and dimensions of most content while also applying colour and effects to brand them stand out. Let's take a look at adding images, creating your own, and applying furnishings to them.
Cartoon on PowerPoint presentations
How to draw on a slide during a presentation

To draw on a PowerPoint slide:
- Click on the Slide Prove tab in the navigation ribbon.
- Click From Offset in the Kickoff Slide Prove group to begin your presentation.
- Cull which slide that you want to write or describe on.
- Select Pointer Options from the list.
- Select a color from the Ink Color choice.
- Cull betwixt Pen or Highlighter.
- Left-click and move your mouse to draw on the slide.
How to erase a cartoon
To erase what you have drawn:
- Select the Slide Evidence with your drawing.
- Right-click on the slide.
- Click on Pointer Options.
- Select Eraser.
- Click on each drawing or line to delete it.
- Select Erase All Ink on Slide to remove all drawings.
To deactivate the drawing tool:
- Right-click on the slide.
- Select Arrow Options in the list.
- Select Arrow to render to slide navigation.
Cartoon shapes
How to add a predetermined shape
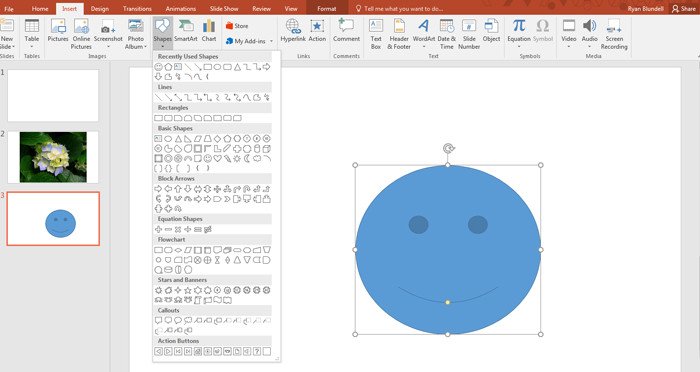
To add a preset shape:
- Select a slide to add a shape.
- Click on the Insert Tab in the navigation ribbon.
- Select Shapes from the Illustrations group.
- Select a shape or option from i of the 10 categories
- Click on any betoken on the slide to add the shape to your cursor location.
- Click on whatever of the bones edit points to resize the shape or invert the shape.
- Click on the rotate icon to change its direction.
How to add a freeform shape with directly and curved segments
To add a freeform shape:
- Click the Insert tab in the ribbon.
- Navigate to the Illustrations group.
- Select Shapes.
- Choose the Freeform pick from the Lines category.
- Click on the slide show to create a starting indicate.
- Click on some other department of the slide to create another point. (A line will appear between them.)
- Click and concord while moving the mouse to create curved lines in a paw-drawn style.
- Click near the first bespeak to finish with a closed shape.
- Double click at whatever moment to stop with an opened shape.
Y'all can also cull to draw freehand, as though you were using a pen. If Scribble has been selected, left-click and hold on any point of the slide and move the mouse to draw freehand.
How to edit points of a shape
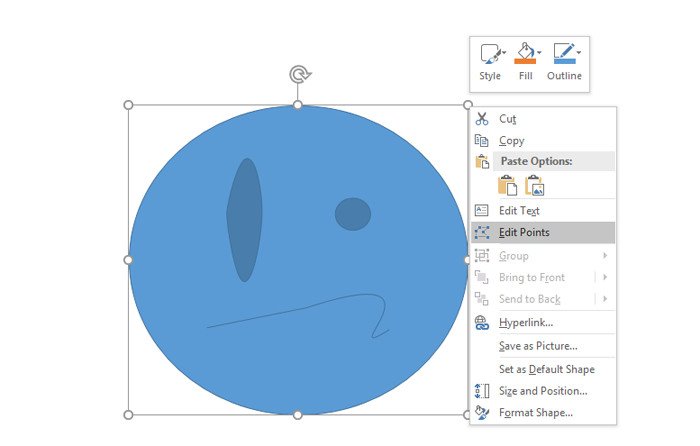
While the preset shapes provided can be used in most situations, you may find that they would ameliorate adapt the slide if yous tweak its shape.
To edit the points of the shape:
- Select a shape on the slide.
- Select the Format tab in the ribbon.
- Select Edit Shape from the Insert Shapes group.
- Select Edit Points.
- Click and drag the highlighted connexion points between lines to alter the path of the lines.
- Click the shape outline while pressing CTRL to add another movable connectedness signal.
- Right-click on whatsoever connectedness point to delete it.
When you right-click on whatsoever connection point, y'all are given access to other options that help you modify your shape. You can transform the connection points to 1 of the following:
- Straight point — This connectedness point joins two line segments without a corner.
- Smooth betoken — This connexion betoken joins also joins two line segments in a non-sharp corner.
- Corner point — This connection point joins two segments in a sharp corner shape.
With time, patience and attempt, you could create unique, detailed fine art without having to use a preset shape.
How to add images in PowerPoint
Photos and images are often a overnice affect in a presentation. They generate a sense of connection and familiarity that draw an audition in.
How to add a picture show
To add pictures in PowerPoint:
- Click on the Insert tab in the ribbon
- Click Pictures from the Images grouping.
- Locate the film you want to add in the dialog box.
- Select the picture.
- Click Insert.
- Click on endpoints to resize the image.
- Click on Picture Styles under the generated Format tab to choose a frame option.
How to adjust the colors on Pictures
To adjust the color of a moving picture:
- Add a color effect.
- Click on a picture.
- Click on the Picture Tools - Format tab.
- Select Colour from the Adjust group.
- Browse through options from the dropdown list. Effects are grouped by Saturation, Tone or Recolor categories.
- Click on an issue to apply to the image.
How to add an artistic effect
To add an artistic effect:
- Ensure the picture show has been selected.
- Select the Picture Tools – Format tab in the ribbon.
- Select Artistic Effects from the Adjust group.
- Scan through the effects. (Live Preview will provide a sample of the results of an event.)
- Click on the chosen effect to utilize to the film.
How to add additional effects to shapes and images
How to fill a shape in PowerPoint
To fill a shape:
- Select the shape or picture on the slide.
- Click on the Drawing-Tools tab.
- Navigate to the Shape Styles grouping.
- Click Shape Fill to open the drib-down.
- Select a fill colour.
- Select a gradient effect.
- Select a texture.
Each style pick also offers a greater option of fill up colors, gradients and textures, which opens up a Format Shape box on the right side of the window. Hither you lot can access transparency settings and quick style selections.
How to add shape and pic effects
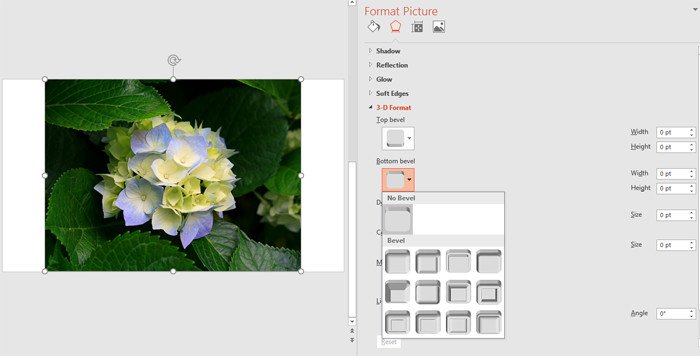
In the Shape Styles group of the Format tab, you will see the selection to add a Shape Outcome. These furnishings provide a measure of depth to both shapes and images. At that place are seven categories to choose from; Preset, Shadow, Reflection, Glow, Soft Edges, Bevel, and 3-D Rotation.
How to alter shape and picture effects
To alter effects:
- Select the Format tab from the ribbon.
- Select Shape Effects from the ribbon. (If using a picture, this will be called Picture Furnishings.)
- Select a category from the driblet-down list.
- Click 3-D Options at the lesser of the secondary list.
- Locate the Format Shape/Format Picture pane on the right side of the window.
- Choose values for each section the list.
The formatting pane allows you lot to modify a multitude of effects. You can change the distance, angle or transparency of shadows, modify the lighting source or even blur reflections. The same effects are available for pictures you have also added.
How to group pictures and shapes
To apply a grouping:
- Click on the slide that contains the images and shapes yous wish to group.
- Press and hold CTRL as you click on the images and shapes.
- Click on the Drawing Tools - Format Tab in the ribbon.
- Click Arrange under the Drawing group.
- Select Group from the dropdown listing.
You can ungroup your images by clicking on Accommodate in the Drawing group and then selecting Ungroup. If yous have changed your mind, or mistakenly ungrouped the images or shapes, the Suit command besides provides a regroup pick.
Wrapping up
These are the nuts to get you started on your new career equally a PowerPoint artist. Do you lot already add shapes and images to your slides? What is the well-nigh creative graphic that you created in PowerPoint? Permit u.s. know in the comments.
Microsoft Part 101: Aid, how-tos and tutorials

How To Add More Shapes To Powerpoint,
Source: https://www.windowscentral.com/how-add-shapes-and-images-powerpoint-slides
Posted by: brechtthenery59.blogspot.com
0 Response to "How To Add More Shapes To Powerpoint"
Post a Comment